What You’ll Learn
- ✓ What Excel actually is — and the real problems it solves for real people
- ✓ Every part of the Excel screen — named and explained in plain English
- ✓ The difference between a workbook, worksheet, and cell (it’s simpler than it sounds)
- ✓ How to move around Excel without constantly grabbing your mouse
- ✓ How to save your file properly so you never lose your work
This introduction to Excel for beginners is exactly what you need if you’ve ever opened Excel, stared at the grid of empty boxes, and quietly closed it again. Maybe you typed something in the wrong cell and panicked. Maybe someone sent you a spreadsheet that looked like it was designed by NASA. Whatever your experience so far — this is where it all starts to make sense.
Excel isn’t nearly as complicated as it looks. It just needs to be explained properly — without the jargon, without skipping steps, and with actual examples from real life. That’s exactly what this lesson does.
This is Lesson 1 of the XplorExcel A–Z tutorial series. You don’t need to have touched Excel before. Let’s go from zero.
Introduction to Excel for Beginners: What Is It and Why Does Everyone Use It?
At its core, this introduction to Excel for beginners starts with one simple idea: Excel is a spreadsheet program — a giant grid where you can store information, do calculations, and make sense of data. Think of it like a super-powered version of a notebook: instead of just writing numbers down, Excel can add them up, compare them, chart them, and update everything automatically when something changes.
It’s been around for over 30 years. Accountants use it. Scientists use it. Teachers, shop owners, HR managers, students — pretty much anyone who works with information uses it at some point. And yes, “Excel skills” appearing in job ads is absolutely why many people start learning it. You’re in good company.
The beauty of Excel is that it scales. You can use it to track your weekly groceries or to build a financial model for a multinational company. Same tool, very different uses.
Excel vs Google Sheets — Which Should You Use?
Here’s the honest answer: for most beginner tasks, they’re nearly identical. Google Sheets is free, browser-based, and great for collaboration. Excel is more powerful when things get serious — Macros, Power Query, large datasets, advanced pivot tables.
If you’re learning for work or career reasons, learn Excel. Most professional environments — finance, HR, operations, analytics — run on Excel. This series focuses on Excel, specifically Microsoft 365, because that’s what you’ll almost certainly encounter in the real world.
What Can You Actually Do With Excel?
More than you’d think. Here are just some of the everyday things people use it for:
| Use Case | Example | Who Uses It |
|---|---|---|
| Budget tracking | Monthly income vs expenses | Students, families, businesses |
| Data analysis | Sales trends, survey results | Analysts, managers |
| Inventory management | Stock levels, product prices | Retailers, warehouses |
| Scheduling | Staff rosters, project timelines | HR teams, project managers |
| Reporting & dashboards | KPI charts, summary tables | Executives, finance teams |
Which Version of Excel Do You Have?
Before you do anything else, it’s worth knowing which version you’re working with — because the screenshots online don’t always match what’s on your screen. Here’s what’s out there:
Microsoft 365 (Subscription)
This is the one most people have through work, school, or a personal subscription. It updates automatically, which means you always get the newest features — things like XLOOKUP and Dynamic Arrays that older versions simply don’t have. If your Excel looks modern and clean, this is probably what you’re on.
Excel 2019 / 2021 (One-Time Purchase)
You bought it once, it stays as it is. No new features, but still completely capable for the vast majority of tasks. Everything in this tutorial series will work on these versions unless I specifically call out otherwise.
Excel Online (Free in Your Browser)
No installation, no cost — just go to office.com, sign in with a free Microsoft account, and you’re in. It’s missing a few advanced features, but for following along with beginner lessons it works perfectly. If you don’t have Excel installed yet, start here.
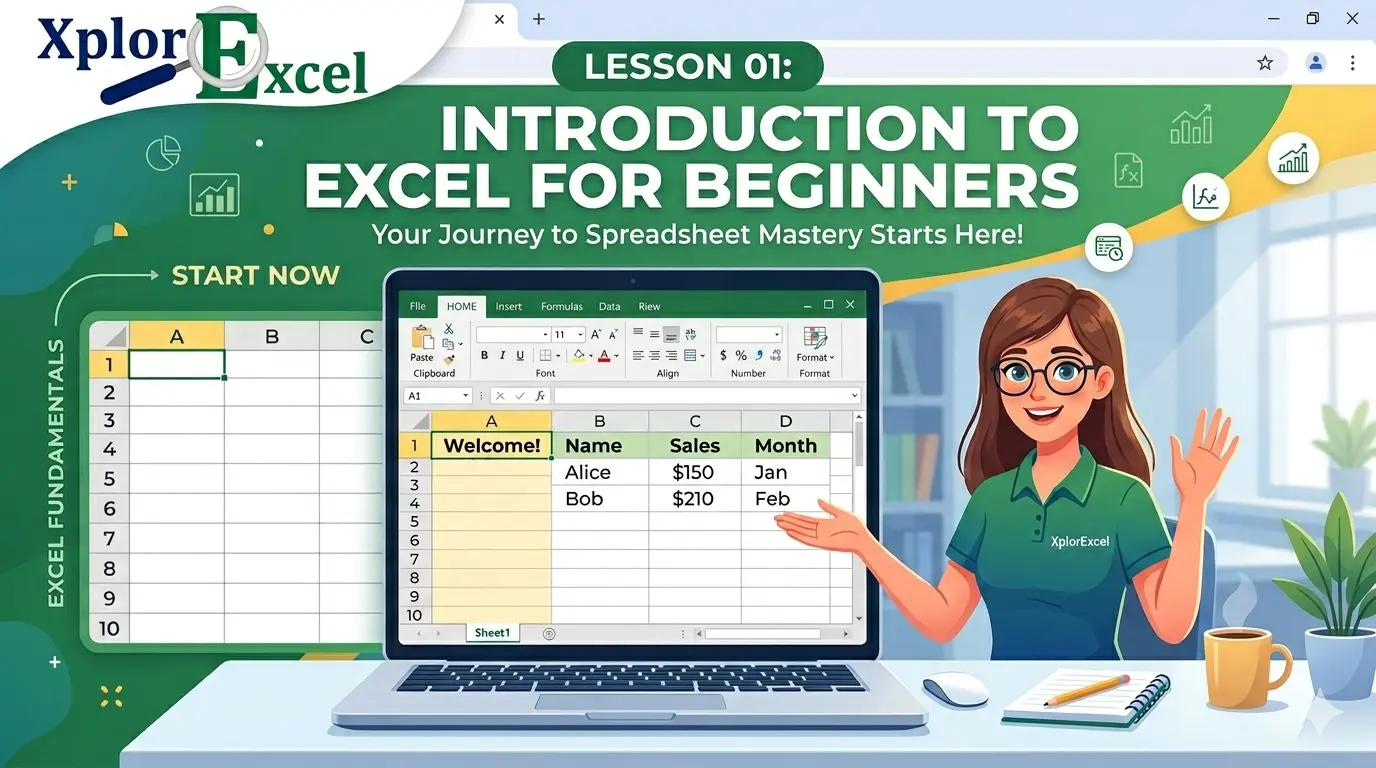
A Tour of the Excel Interface
When you first open Excel, it can look a bit overwhelming — there are buttons everywhere, a huge grid, tabs along the bottom. But here’s the thing: once you know what each area does, it actually makes a lot of sense. This is one of the first things any good introduction to Excel for beginners must cover — the layout. Let’s go through it piece by piece.
The Ribbon — Your Main Toolbar
That wide strip of buttons and menus running across the top? That’s the Ribbon. It holds pretty much every command Excel has, organised into tabs: Home, Insert, Formulas, Data, View, and more. As a beginner, you’ll spend almost all your time on the Home tab. Don’t worry about the rest for now.
The Quick Access Toolbar
Look above the Ribbon — there’s a tiny row of icons up there. That’s the Quick Access Toolbar. By default it has Save, Undo, and Redo. You can add your own most-used commands here later. Think of it as your personal shortcut bar.
The Name Box and Formula Bar
Just below the Ribbon, on the left, you’ll see a small box showing something like A1. That’s the Name Box — it tells you which cell you’re currently in. Next to it is the Formula Bar, which shows exactly what’s inside that cell. If the cell contains a formula, this is where you’ll see it. These two will become your best friends.
The Worksheet Area (The Grid)
This is where everything happens. The big grid in the middle of the screen is your worksheet — columns running left to right (labelled A, B, C…) and rows running top to bottom (labelled 1, 2, 3…). Every single box in that grid is a cell, and each one has its own address. Fun fact: a single Excel worksheet has over one million rows. You’ll never fill it up.
Sheet Tabs at the Bottom
See those little tabs at the very bottom of the screen labelled Sheet1? Those are your worksheets. One workbook can have many sheets. You can rename them, add more with the + button, and colour-code them. Very useful when you’re organising a big project.
The Status Bar
Right at the very bottom of the window is the Status Bar. Most people ignore it, but it’s surprisingly handy — select a few numbers and it instantly shows you the sum, average, and count without you having to type a single formula. The zoom slider lives here too, on the right side.
The Ribbon takes up a lot of screen space. If you want more room to work, double-click any tab name to collapse it — the commands disappear and only the tab names stay visible. Click a tab to peek at the commands, or double-click again to pin them back. You can also press Ctrl + F1 to toggle the whole thing. Once you start working on larger spreadsheets, you’ll love having that extra space.
Workbook, Worksheet, and Cell — What’s the Difference?
This trips up almost every beginner. People use these three words interchangeably when they actually mean three different things. Let’s sort it out once and for all — because once you get this, everything else clicks.
Think of it like a physical notebook sitting on your desk:
Key Definitions
Workbook
The whole file — the thing you save, email, and open. It has a name like Budget_2025.xlsx. It’s your notebook.
Worksheet
One tab inside the workbook — like a single page in that notebook. You can have many worksheets inside one workbook, each with different data.
Cell
One single box in the grid — like one line on a page. Every cell has its own address made of its column letter and row number, like B3 or A1. That’s where your data actually lives.
So: the workbook is the file, the worksheet is one tab inside it, and the cell is one box on that tab. Simple as that.
You’ll also hear people say “spreadsheet” to mean any of these things — that’s fine in everyday conversation, but now you know the precise difference. When you’re ready to go deeper, check out Lesson 11 on cell references — it builds directly on this.
How to Navigate Excel Without a Mouse
Trust me on this one — learning keyboard navigation early is one of the best investments you can make. When you’re working with hundreds of rows, reaching for the mouse to click cell by cell becomes incredibly slow. Keyboard shortcuts feel awkward for about five minutes, then they become second nature.
Here are the ones you’ll use every single day:
Keyboard Navigation — Essential Shortcuts
Arrow Keys
Move one cell at a time in any directionTab
Move one cell to the rightEnter
Confirm entry and move one cell downCtrl + Home
Jump straight to cell A1 — use this constantlyCtrl + End
Jump to the last cell that has data in itCtrl + G
Open Go To — type any cell address and jump thereJumping to a Cell Using the Name Box
Here’s a trick most beginners don’t know about. See that little box to the left of the Formula Bar showing A1? Click it, type any cell address — say D50 — and press Enter. You’ll teleport straight there. No scrolling, no hunting. On a big spreadsheet this is a genuine lifesaver.
The Name Box also helps you understand how cell references work — something we dig into properly in Lesson 11.
Almost everyone does this at first: clicking each cell individually with the mouse when entering a column of data. It feels natural but it’s painfully slow. Instead, just press Enter after each entry — Excel drops you one cell down automatically. Entering data across a row? Use Tab to move right. And here’s the clever part: when you press Enter at the end of a Tab sequence, Excel jumps back to the column where you started. Give it a try right now — it’ll save you hours over time.
How to Save Your Excel File
XLSX — The Format You’ll Use 95% of the Time
When you save an Excel file, the default format is .xlsx. This is the standard Excel format and it supports everything — formulas, charts, formatting, multiple sheets, the lot. Unless someone specifically asks you for a CSV or another format, always save as .xlsx. We cover all the other formats in Lesson 10 — Save, Share & File Formats.
Save vs Save As — Know the Difference
Save (Ctrl + S) saves changes to the file you already have open. Save As (F12) lets you save a brand new copy — different name, different folder, different format. Use Save As any time you want to keep a version history or create a backup before making big changes.
Auto-Save in Microsoft 365
If your file is saved to OneDrive or SharePoint, you’ll see an Auto-Save toggle in the top-left corner of Excel. When it’s switched on, every change you make is saved in real time — no more losing work because you forgot to hit save. That said, build the Ctrl + S habit anyway. It takes half a second and will save you a lot of pain one day.
3 Real Situations Where Excel Makes Life Easier
Still not sure where you’d actually use Excel? Here are three everyday situations that should feel familiar:
The Student Who’s Always Broke
You put your monthly income in one cell and your expenses — rent, food, transport, that streaming service you forgot about — in the cells below. Excel adds them up instantly. Change one number and the total updates on its own. No calculator, no scribbling. You’ll actually know where your money goes.
The Shop Owner With a Notebook Problem
Product names in column A, quantities in column B, prices in column C. Excel can calculate your total stock value, highlight what’s running low, and sort your products alphabetically — in seconds. What used to take a messy notebook and a calculator now lives in a clean, searchable spreadsheet.
The HR Manager Drowning in Paper
Fifty employees, thirty working days, one sheet. Each row is a person, each column is a date. Excel can count who was present, who was late, who took the most sick days — and generate a monthly summary without you typing a single number twice. The thing that used to take an afternoon takes about ten minutes.
Open Excel right now — or head to office.com if you don’t have it installed — and work through these five steps:
- Click cell
A1— check the Name Box, it should say “A1” - Type your name and press Enter — you drop to A2 automatically
- Type any number and press Tab — you move to B2
- Press Ctrl + Home — you’re back at A1 instantly
- Press Ctrl + S and save the file as
MyFirstExcel.xlsx
That’s it. You just opened, navigated, typed in, and saved your first Excel file. Lesson 1 is done.
Up Next
Lesson 2: Cells, Rows & Columns
Cell addresses, selecting ranges, resizing rows and columns — let’s get into the grid.